

I've been on a bit of a craft kick these days, what with the fall and "indoors only" weather quickly approaching. Ok, who am I kidding? I hate being outside. Whatever.
The other day, I had this wild idea about making a message center (of sorts) for my kitchen. I don't have enough counter space for a real cookbook holder, and most of my recipes come from the internet - so I find myself pacing around with the printed out 8-1/2 X 11 recipe stuck into my bra strap so it's at the ready when I need it. Half the time, the recipe ends up coated in a light mist of whatever I am making, not because my boobs are near my cooking, but because I am the sloppiest cook in the entire world.
Sidenote: I also use every dish in the apartment when cooking or baking - I can't be bothered to take the time and wash as I go along. I simply cannot. This is one of the most irritating things about me.
So I decided that I'd create my own version of a bulletin board, and here is a simple breakdown so that you can MAKE YOUR OWN! I know! Just what you ALWAYS wanted to do! I should have my own craft show on the Fine Living Network in which I showcase the world's most random DIY craft projects.
This isn't just ANY run-of-the-mill bulletin board - it's an interchangeable, stylish place to put photos, hang recipes out of harms way, etc. This ain't no tacky cork board from the dry erase aisle at Office Depot.
Ok, so here is what you need to make your own ghetto fabulous DIY bulletin board:
1-2 yards of a fabric of your choice
1 blank, pre-stretched canvas
Some way to attach the fabric to the canvas - I don't own a staple gun, so I used upholstery tacks instead.
1 hammer
1 level
nails
scissors
1 ruler or roll of measuring tape
Step 1: Cut your fabulous fabric to fit not just the surface of the canvas, but also the edges, leaving enough to wrap around in the back. I've chosen a moire-like silver polyblend in the hopes of mimicking the stainless steel appliances in my kitchen.

Step 2: After deciding which way the fabric will hang (based on the intended wall placement of the canvas), center the canvas on the piece of fabric and pull one side over to attach. This is the guide for the entire thing, so be cautious. Or just do what I did, and steamroll through this step, and hope for the best. (the second strategy is a lot more justifiable if wine is involved.)

Step 3: Further reinforce the first side of the backing, then pull opposite side tight and anchor. This is a good time to put down the wine, and inspect the tension of the fabric against the canvas. If you can bounce a hand off the front and the fabric moves WITH the canvas, it's tight enough. If the fabric moves by itself, it's too loose.
Step 4: Time to work the corners. If you're really bad at (a) making the bed, and/or (b) wrapping gifts, I'd suggest you go slowly on this one. Fold the top piece of the fabric from the stapled side DOWN over the edge of the looser, unstapled section of fabric. As you trace over the back edge of the canvas, you'll notice that the outer edge of the fabric pulls in - grab it and yank it upwards until you can see the corner of the canvas stretching through the fabric. Work this until you've made a clean corner. Or get somebody who is better at this to do it for you.

Step 5: Repeat steps 3 and 4 until you've got the entire thing stapled up GOOD AND TIGHT. In my case, this took the entire case of upholstery tacks. It's the back, so don't worry - nobody has to see that I'm (ahem, I mean you're) a total, crazy, anal perfectionist.

Step 6: Turn the almost finished piece over to make sure that the fabric is hanging correctly. Or, if you're me, pour yourself another glass of wine and hope like hell that the pattern is straight.
Step 7: Trim any excess fabric from the back of the canvas - trimming enough to allow the proper hanging of said canvas but not so much that the piece sits off the wall. You want it to be as slim and sleek looking as possible.
Step 8: Hang on wall with nails and hammer. Make sure it's placed correctly so that it hides that god-awful landline phone jack that has been bugging you for months.

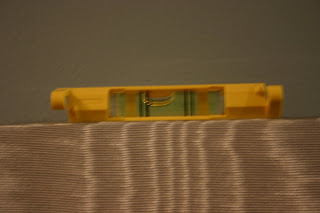
Step 9: Check to make sure it's level. In my world, if the bubble is even CONSIDERING the middle of the center zone, it's good enough.
Step 10: Grab some pushpins, notes, recipes. and stab away! Gaze lovingly at your fabulous creation, and remember that if you hate it in two months (which I inevitably will), one can always change the fabric.
et Voila! For a total cost of $12 or so, you've got a fantastic, customized message board that is interchangeable and cute! There won't be a picture of my finished message board because I am a complete idiot! Huzzah!
The other day, I had this wild idea about making a message center (of sorts) for my kitchen. I don't have enough counter space for a real cookbook holder, and most of my recipes come from the internet - so I find myself pacing around with the printed out 8-1/2 X 11 recipe stuck into my bra strap so it's at the ready when I need it. Half the time, the recipe ends up coated in a light mist of whatever I am making, not because my boobs are near my cooking, but because I am the sloppiest cook in the entire world.
Sidenote: I also use every dish in the apartment when cooking or baking - I can't be bothered to take the time and wash as I go along. I simply cannot. This is one of the most irritating things about me.
So I decided that I'd create my own version of a bulletin board, and here is a simple breakdown so that you can MAKE YOUR OWN! I know! Just what you ALWAYS wanted to do! I should have my own craft show on the Fine Living Network in which I showcase the world's most random DIY craft projects.
This isn't just ANY run-of-the-mill bulletin board - it's an interchangeable, stylish place to put photos, hang recipes out of harms way, etc. This ain't no tacky cork board from the dry erase aisle at Office Depot.
Ok, so here is what you need to make your own ghetto fabulous DIY bulletin board:
1-2 yards of a fabric of your choice
1 blank, pre-stretched canvas
Some way to attach the fabric to the canvas - I don't own a staple gun, so I used upholstery tacks instead.
1 hammer
1 level
nails
scissors
1 ruler or roll of measuring tape
Step 1: Cut your fabulous fabric to fit not just the surface of the canvas, but also the edges, leaving enough to wrap around in the back. I've chosen a moire-like silver polyblend in the hopes of mimicking the stainless steel appliances in my kitchen.

Step 2: After deciding which way the fabric will hang (based on the intended wall placement of the canvas), center the canvas on the piece of fabric and pull one side over to attach. This is the guide for the entire thing, so be cautious. Or just do what I did, and steamroll through this step, and hope for the best. (the second strategy is a lot more justifiable if wine is involved.)

Step 3: Further reinforce the first side of the backing, then pull opposite side tight and anchor. This is a good time to put down the wine, and inspect the tension of the fabric against the canvas. If you can bounce a hand off the front and the fabric moves WITH the canvas, it's tight enough. If the fabric moves by itself, it's too loose.
Step 4: Time to work the corners. If you're really bad at (a) making the bed, and/or (b) wrapping gifts, I'd suggest you go slowly on this one. Fold the top piece of the fabric from the stapled side DOWN over the edge of the looser, unstapled section of fabric. As you trace over the back edge of the canvas, you'll notice that the outer edge of the fabric pulls in - grab it and yank it upwards until you can see the corner of the canvas stretching through the fabric. Work this until you've made a clean corner. Or get somebody who is better at this to do it for you.

Step 5: Repeat steps 3 and 4 until you've got the entire thing stapled up GOOD AND TIGHT. In my case, this took the entire case of upholstery tacks. It's the back, so don't worry - nobody has to see that I'm (ahem, I mean you're) a total, crazy, anal perfectionist.

Step 6: Turn the almost finished piece over to make sure that the fabric is hanging correctly. Or, if you're me, pour yourself another glass of wine and hope like hell that the pattern is straight.
Step 7: Trim any excess fabric from the back of the canvas - trimming enough to allow the proper hanging of said canvas but not so much that the piece sits off the wall. You want it to be as slim and sleek looking as possible.
Step 8: Hang on wall with nails and hammer. Make sure it's placed correctly so that it hides that god-awful landline phone jack that has been bugging you for months.

Step 9: Check to make sure it's level. In my world, if the bubble is even CONSIDERING the middle of the center zone, it's good enough.

Step 10: Grab some pushpins, notes, recipes. and stab away! Gaze lovingly at your fabulous creation, and remember that if you hate it in two months (which I inevitably will), one can always change the fabric.
et Voila! For a total cost of $12 or so, you've got a fantastic, customized message board that is interchangeable and cute! There won't be a picture of my finished message board because I am a complete idiot! Huzzah!
<< Home